How to Install Wilcox Rotating Rings
By Daniel Maloney
 If
you have ever found your eyepiece in an awkward position
when using your equatorial-mounted Newtonian, then you've
discovered how difficult it is to rotate the OTA without
throwing off the balance of the scope. If
you have ever found your eyepiece in an awkward position
when using your equatorial-mounted Newtonian, then you've
discovered how difficult it is to rotate the OTA without
throwing off the balance of the scope.
Wilcox Rotating Rings are just what the doctor ordered.
After installing these, you will be able to easily rotate
your tube assembly so that your eyepiece is again in
a comfortable position.
Who is Wilcox you say? Erik Wilcox is the inventor
of the rotating rings I will discuss in this article.
You can find often find him helping others, giving reviews,
and sharing great ideas (like these rings) on cloudynights.com.
His member level of 'Telescope Surgeon' fits him to
a tee. His invention - albeit simple and cheap - has
made many amateur astronomer's nights a lot more pleasurable.
So I would like to thank him for sharing his idea with
all of us through writing this article outlining his
design step by step. I hope that one day, a Telescope
manufacturer may see this article and hopefully start
offering these as standard equipment on all EQ-mounted
Newtonians. Using these rings for just one night will
definitely make you wonder why some manufacturer has
not picked up on this yet. So without further ado, let's
get going on the path to making your own set of Wilcox
Rotating Rings.
Note: In this article,
the rings you are building are referred to as "Wilcox
rings", while the mounting rings that normally
hold your OTA are referred to as "scope rings".
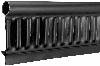
Materials:
|
 1
- 20 Foot Roll of Garden Edging 1
- 20 Foot Roll of Garden Edging
|

4 - Hose Clamps (sizes depend on the size of theNewtonian
you are putting the rings on)
|
Tools:
- High grade scissors or knife
- Branch trimmers or equivalent tool to cut hard
plastic tubing
- Flat Head Screwdriver (to tighten the hose clamps
above)
That's all you need! Simple enough right? What we do
with the materials is simple as well!
 Measure
& Cut Measure
& Cut
First, measure the diameter of your OTA and then cut
off that amount from your roll of garden edging using
branch trimmers or equivalent tool.
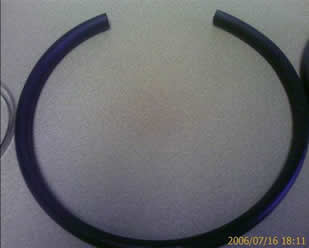
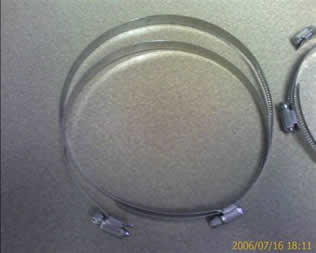
You will only need to use the hard plastic tube part
of the garden edging, so using scissors, cut away the
plastic hanging from the tube. You may need to take
two runs, it is quite difficult to get close to the
plastic tube with scissors. You should then have a ring
as shown on the right.
Make two of these rings.
Join Clamps and Run Through Plastic Tubes
Once you have your plastic tubes cut, join
your hose clamps together, as shown below.
|
Next, run the clamp through one
of the plastic tubes you cut out (below).
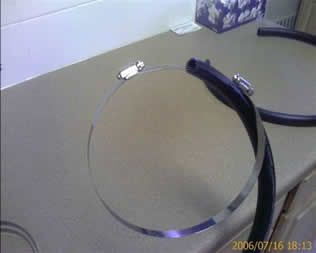
|
Notice, left, how much of the hose clamp comes out
of both sides of the plastic ring. This is all you need
to join the clamp together.
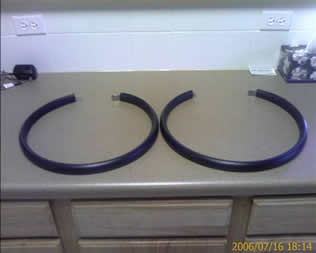
Next comes the fun part; mounting the Wilcox rings
onto your OTA!
Mount Rings on the OTA
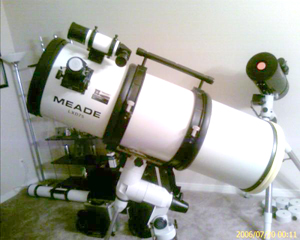
 To
get the Wilcox rings onto my Meade SN-10 OTA, I joined
the ring clamps before putting it on the OTA. To
get the Wilcox rings onto my Meade SN-10 OTA, I joined
the ring clamps before putting it on the OTA.
When doing this, I just got the clamp started and made
sure it was loose enough to slide onto my OTA. I then
removed my scope rings from the OTA and slid on the
Wilcox rings as shown below. You do not have
to do this, as it is almost as easy to do the whole
operation with the scope rings in place. I found it
a tad easier (due to my chubby fingers) to get the ring
started without the OTA in the way.
Oh, and one thing to make sure of, whichever way you
are putting the rings on, the side of the plastic
garden edging tube that did not have the plastic attached
to it, is the edge that go up against the scope rings.
This allows for a much more even surface to rotate against.
Next, push the Wilcox ring that will be next to the
top scope ring into place, and re-attach your scope
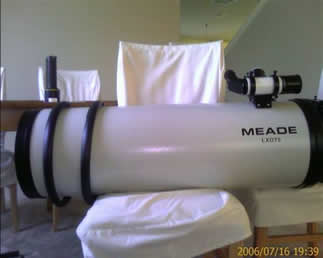
rings. Both Wilcox rings should be on the outside of
the scope rings they will rotate against (look at final
photo below for a reference).
Now mount your OTA with all your rings onto your equatorial
mount and balance your scope as for an observing session.
This will ensure that the position of the mounting rings
will be correct before the Wilcox rings are tightened.
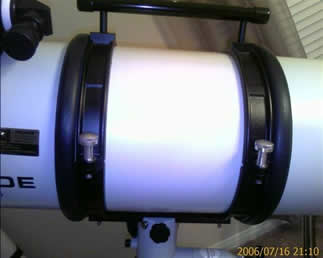 Tighten
the Rings Tighten
the Rings
Now you are ready to tighten down each Wilcox ring
using a flat-head screwdriver. Tighten the hose clamp
on the inside of each ring, being careful not to over
tighten, but at the same time. ensure that the rotating
ring cannot move up or down the OTA. Once you have the
ring tight enough, you should have an installation as
shown, right.
You are now ready to use you rings! All you have to
do is loosen the scope rings enough to allow you to
rotate the OTA and voila! you no longer have an object
in the sky that you cannot view due to an awkward viewing
position! Make sure you always re-tighten your scope
rings before transporting the OTA if you use a handle
(as in the picture on the right).
Finally, I suggest that you buy a spare dovetail bar
to mount on top of your scope rings to add stability
when using the Wilcox rings.
Best Always and Clear Skies,
Daniel Maloney
 Mild-mannered
programmer by day, caped-crusading amateur astronomer
by night, Ohio-native Daniel Maloney lives in Round
Rock, Texas and is a member of the Austin
Dam Astronomers of Austin, TX. Daniel is the developer,
technical advisor and frequent contributor to Telescope
Junkies, the Andy's ShotGlass Amateur astronomer's
forum. Mild-mannered
programmer by day, caped-crusading amateur astronomer
by night, Ohio-native Daniel Maloney lives in Round
Rock, Texas and is a member of the Austin
Dam Astronomers of Austin, TX. Daniel is the developer,
technical advisor and frequent contributor to Telescope
Junkies, the Andy's ShotGlass Amateur astronomer's
forum. |